Showing posts with label Practical Skills. Show all posts

Saturday, September 10, 2011

National Sewing Month

Image is from here.
Ooooh how exciting!

September is National Sewing Month!!!

Some lovely sewing facts!
Every year there is a theme and this month's theme is "Sew for the Love of it!", which I think is great for the first time I will be taking part in my very own National Sewing Month! Not that I really need an excuse to sew, but it is all about home sewing and the things you love to make.

 
If you head on over to http://www.nationalsewingmonth.org/ you can find out all about it, and they even have a **Competition** for all you lovely lucky people in the US! And even though I can't enter because I am in the UK, I will still make something featuring the "love heart" just because I sew for the love of it!

What are you doing to take part in National Sewing Month? What are the kinds of things you love to sew?


Saturday, July 30, 2011

My Tailor's Dummy

When i left work on Friday, my leaving present included a menswear tailor's dummy. I absolutely love it and can't wait to use it in my final year! At university there are stands for us to use however it'll be great for me to have one to use at home too.
It's got a metal stand and a black body cover, so it's looking pretty stylish. Especially in Nathan's superman costume so far that I made him that you can see in the photo below.
This gift will allow me to adjust patterns, fit toiles and garments and to display the finished product. It will also hopefully encourage me to start more personal projects.


Image from my phone (sorry for the poor quality!)

Tuesday, May 31, 2011

Superhero Costumes - Part 3

After making the specifications I could then begin to draw up the pattern for the Superman t-shirt. This is something I have learned to do since working for Cohen and Wilks and I think it will be really useful for my final year at university.


 Once I knew how wide the top would be then I made a small pattern for the Superman logo to be appliqued to the front. This was done by cutting out the outline shape in 3 layers of fabric - 2 yellow (to stop showthrough of the blue) and one layer of red. I then cut out the red part to give the logo and pinned this in place onto the yellow fabrics. I used a zig-zag stitch to completely secure the "S" in place.


I really love the effect of this as it looks smooth, and neat and I know there is no chance the fabric could fray or spoil. If I was to do this again however I would use an interlining just to stiffen the red fabric as little, as I found it did move as I stitched it.
 
I then placed the logo onto the front of the fabric and stitched this into place. Next I stitched the front and back together at the side seams and shoulder seams.


My next steps to complete this part of the costume is to finish the seam allowances, stitch in the sleeves, stitch the hem, cuffs and collar. and this part will be complete. I will put up a photo of Nathan wearing it once it has been completed.

All photos are from my camera.

Saturday, May 28, 2011

Upcycling - Turning Jeans into a Skirt

Over Easter, I had a few days off from work, and during this time I decided to do a big Spring Clean. This involved everything (except my boyfriends things of course) from clothes to collected clutter. I then went through all my clothes to decide which fabrics I wanted to use, to those things that were suitable to give to charity. I found I had a pair of Topshop jeans that weren't too battered and beaten to be chucked away, and that were a nice denim that it could be useful to use in design journals next year.

Then I thought about Upcycling these jeans into a denim skirt - it is summer after all! So here is how I did it:


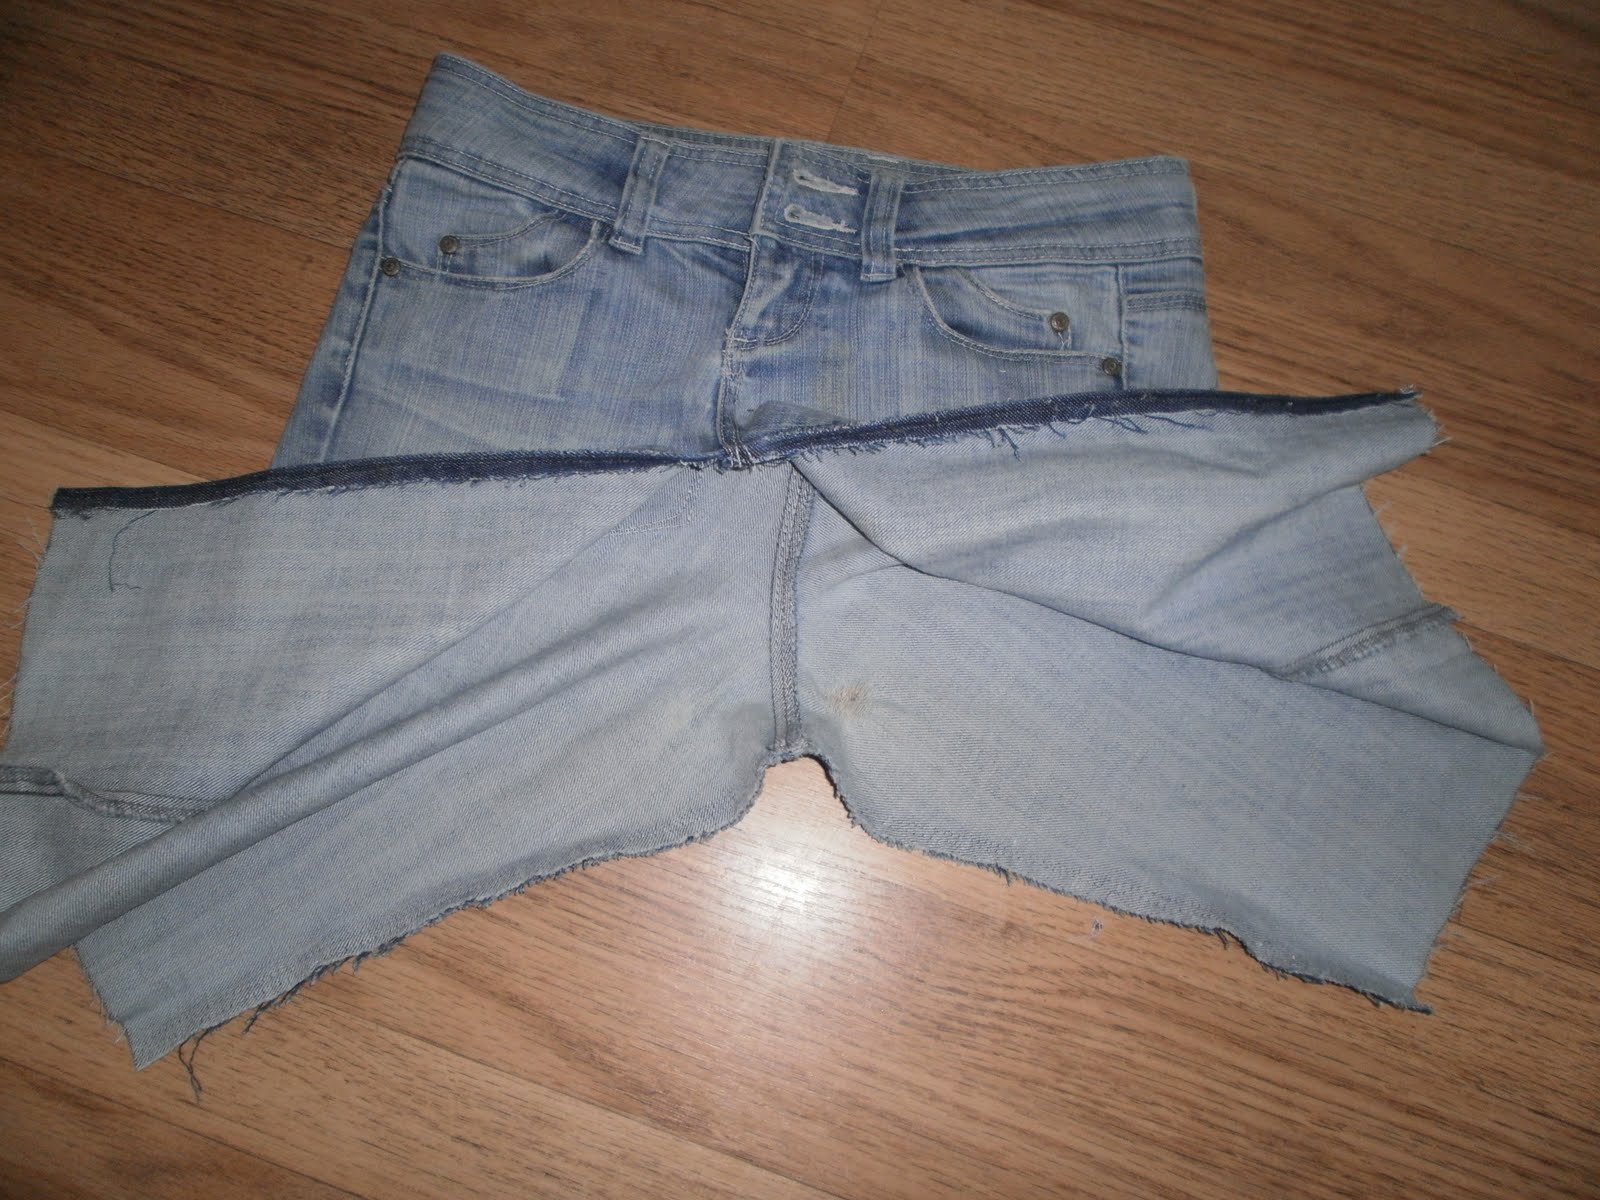
 I took the jeans pictured above, and I cut them at the knees (as in the picture below), much longer than I anticipated the skirt to be, so that I could choose the desired length later, and leave enough extra on the hem the skirt.


I then opened the Inside Leg seams to open the jeans into a skirt. The Front Rise was unpicked to the bottom of the zip fastening and the back rise was unpicked up to halfway of the seam.


I then changed the way the back rise sat, eliminating the curve as much as possible to create a straight seam. I then added the extra top-stitching as in the original design of the jeans.


At this point, I cut the skirt to the desired length with added hem depth. I then pinned the front rise so that it overlapped under the zip and lay flat. I cut up part of one of the remaining legs to add an insert into the front where the inside legs now opened out. I then stitched this in place following the original design of the top-stitching.


To finish the skirt I hemmed it, and pressed it. The finished result can be seen below!


I would really recommend Upcycling your old clothes, maybe you find something boring now and would like to update it's style? It took me 2 and a half hours to change these jeans into a skirt, and it is definitely worth taking the time to do it.

Feel free to let me know what you've upcycled!

Images are from my own camera.

Friday, May 27, 2011

Superhero Costumes - Part 2

The next part of my superhero journey was fabrics - this always gets me more excited about a task as I can start to visualise it. I know I should have really made specifications first to minimise fabric waste, however I like having spare fabric left over afterwards.

So below is a photo of the fabrics for both costumes, I already think they look very superhero-esque!


I bought these fabric from Samuel Taylors in Leeds, you will find their website here.

Image is from my own camera.

Wednesday, May 25, 2011

Superhero Costumes - Part 1

Well, it's been a while since I have posted on here, but I'm about to start a little project in preparation for a night out to celebrate my boyfriends 21st birthday.

So the plan is, to go out on a pub crawl with a bunch of friends all dressed as different superheroes. As a fashion design student, who loves a challenge, I have decided to make our costumes. I will create specs, make patterns and sew, sew ,sew until my heart is content.

Our choices for heroes are...
Superman

and...
Wonder Woman

It's all very exciting! I'm really looking forward to making our very own outfits, so I thought I'd document the little story on here and show you my journey along the way!

There will me more posts to follow soon!! I hope you enjoy.

The images are from google.co.uk

Sunday, January 23, 2011

Just a little something...

Well, it's been a while since I have written on here. I've been very busy over the past 6-7months doing my placement in QA at Cohen and Wilks. It has been an amazing experience so far and I am still learning so much from it. I have been working with Childrenswear, which is a new experience for me, and my role mainly consists of requesting tests on fabrics and components (so the garment will be safe) and measuring and checking garments for quality. I personally work with TU@Sainsbury's, Littlewoods, Dunnes and Peacocks as customers. Other customers Chen and Wilks supply to are M&S, Debenhams, Next, Mothercare, George, Tesco and John Lewis, as well as many others. I have worked and inspected garments for all these customers, which has shown me the differences in childrens clothing in the High Street. I have gained so much experience, more than I could imagine, since I started working there and I love my role as a QA, and although I don't get to make things, I am certainly considering working more in QA after university.
It'll be weird going back to university but I am looking forward to the work and projects I will be set in Final Year, even though it will be a HUGE amount of work. I've already started considering what I'll write about in my dissertation and what my designs and final collection could be based on. I think what I'm looking forward to most abotu going back to uni is the fact I'll be spending more time being creative again.
Well to end this post I thought I'd show you the suit jacket and trousers that I made for Nathan, which he wore to the Cohen and Wilks Staff Christmas Party.


Image taken from my camera. Thanks to Nathan Whitehouse for allowing me to use this photo of him.

Friday, May 14, 2010

A Level Art - Using Fabrics to Create a Picture


The image of the work above is one of my A Level pieces that I constructed with fabric. First I laid out some fabrics and placed a shiny, reflective vase in the centre and painted the composition. Next I redrew the picture but more simply onto some calico fabric and used the key colours from the fabrics to recreate it. As I had previously painted it, it was quite simple to portray it with fabrics, using the painting to give me the reflections in the vase. I attached the fabrics in an applique style with a zig-zag stitch around the outer edge, preventing the fabrics from fraying. I then used organza over the vase part to give the vase its shiny appearance. This worked well because the organza is translucent so you could still see the other fabrics underneath. To finish the piece off I embellished some sections of the fabrics (the ones that were patterned) with beading.

Image from my own camera.

Monday, May 10, 2010

Nonwovens Nonsense - The Trousers

A few weeks ago, I posted about the second semester's Garment Technology project FASHION: Decoratif, and showed a sample of a jacket front we had made based on a piece from Margiela's current Spring/Summer 2010 collection. We were given a floral jacket, which we decided to replicate in two different ways, and to also make a pair of trousers, to go with both. The deadline for this project was last Friday, however we have been limited in the construction of the jackets so these are not complete for me to show yet, but pictures of all finished garments will be up as soon as possible.

Originally we wanted the trousers to be sonic bonded, but with pressure growing we decided as a group to make them ourselves. The fabric we had chosen for our jackets and trousers was PVC, which we have now found out is a difficult fabric to sew and make garments from, but the challenge was worth it in the end. The trousers have laser cut strips and back pockets, based on a floral net curtain we purchased from the market. Below you will find the construction pages we put together and also a photo of the trousers we took before we put the waistband on.


All Images of Group work by Amy Gibson, Emma Clarke and myself, image of trousers is taken from my own camera

Tuesday, April 27, 2010

A Level Art

In my A level art classes, instead of drawing and painting in the conventional way, I used my talent from textiles, sewing. I enjoyed this so much more, I found my work to be unique and completely different to what everyone else was doing.


I took some inspiration from Gustav Klimt's painting called "The Kiss" for one of my pieces. The colours and All Seeing Eye seen throughout this painting inspired my piece.


First I embroidered an eye using different shades of green and blue on silk. I then stitched some gold fabric with red swirls and twists in different ways. The eye was then attached to this and I embroidered the golden and red swirls with beads. The piece was designed to look luxurious, which was achieved by the intricate detail in the eye, the golden fabric and the beading.

Image of the painting is from http://en.wikipedia.org/wiki/File:Gustav_Klimt_016.jpg and the image of my work is from my own camera

Thursday, April 22, 2010

Nonwovens Nonsense?

This semester in Garment Technology, we have had group work in a project called Nonwoven: Decoratif. My group, made up of Amy, Emma and myself (all menswear designers) were given a leather jacket with embroidered cross-stitch roses embellished over the front and sleeves, designed by Martin Margiela. We were also asked to design and make some nonwoven trousers that would work with the key piece. Unsure on where to take this, we tried out a number of different experiments to help us decide on the route we would take with this jacket. We tried tie-dye, beading, painting, sculpting and just about everything you could think of. Eventually we came up with some very inspiring ideas.

Using PVC for all our nonwoven garments, we have come up with 3 very different, but well themed items. The trousers will be pretty basic, sonic bonded with laser cut strips and pockets as their decoration. The first jacket is clear with green coverstitched seams and bright red and blue felt roses placed in a similar fashion to Margiela's original jacket. Our second jacket is painted silver and gold with a haybale netting texture teamed with sequins and beading stitched to create abstract flowers over the jacket.

All of this has been challenging but very inspiring, and now as we watch the garments being put together, it is getting very exciting and we get closer to the end of year show that will document our items.

Below is an early sample of the jacket with roses, to display how these would work in the final garment.


Image from my own camera of work by myself, Emma Clarke and Amy Gibson.

Monday, January 25, 2010

Garment Technology - Rever Collars

The next area in Garment Technology that I researched into was Rever Collars. This gave me a better idea of what exactly I would be making in that lesson. Rever collars are made up of two pieces, the lapel (or rever) is separate to the main collar which gives more variety in shape and how it sits against the body that many one-piece collars. The board shows a variety of rever collars in knit, coats and jackets as well as flat drawings of them. Below this is the example of the rever collar I made. If I was re-doing this sample, I would change the shape and style of my rever, making it narrower and wider.


Images are of my own work and are taken from my camera. Thankyou to Nathan Whitehouse for modelling my final garment.

Wednesday, January 13, 2010

Garment Technology - Shoulder and Sleeve Details

The next research board I had to complete was for 'Shoulder and Sleeve Details'. I found this interesting in menswear because some of the details I found were very discreet. I was surprised at the range I found from appliqué to embroidered details, as well as stripes and tabs. The sample we had to make in relation to this research was a 'Strap-Shoulder Sleeve', which I hadn't really seen before. This was good because it showed me a different type of shoulder detail and how it sat on the shoulder, which could not be achieved by the other shoulder styles I knew.


Images are from my camera and are of my own work. Thankyou to Nathan Whitehouse for modelling my final samples.

Thursday, January 07, 2010

Garment Technology - Waistcoats

Here is the research board i did when researching into waistcoats. There is a wide range of both primary and secondary images on this board as well as some historical. Below are the front and back views of the waistcoat sample i made. This was the most interesting sample for me because we made a complete garment and the fabrics were interesting to work with too.


Images are from my camera and are of my own work. Thankyou to Nathan Whitehouse for modelling my final garments.

Monday, January 04, 2010

Garment Technology - Hoods

Over the past two years at university, we have studied a module called Garment Technology. In this module there are two main areas, these are the analytical side and the practical side to garments. For the analytical part, we have to visit a range of stores and research into garment styles and features, find images and take pictures, and then analyse these to give us a greater knowledge about the differences found in each area. This knowledge is then applied into the practical side, to allow us to make a pattern and construct a garment featuring an aspect of this area. The first area we were given this year was hoods. Below is the page displaying the different types of hoods I found. These included those found on outerwear, dressing gowns and in academic dress. Below this are photographs of the hooded garment I constructed. The research in this module can also be used to inspire a wider range of designs in other modules and personal projects.


Images are from my camera and are of my work. Thankyou to Nathan Whitehouse for modelling my final garment.
Related Posts with Thumbnails